


Linux应用开发加油:创建WebSphere(1)
发表于:2007-07-04来源:作者:点击数:
标签:
单元管理器(Cell manager) 也叫做 Deployment Manager,它通过与单元中每台实际计算机上运行的 Node Agent 进行交互来管理分布式拓扑中的多个节点。技术上讲,它是运行了一个管理控制台实例的应用程序 服务器 ,可以管理所有配置在同一个单元中的应用程序
单元管理器(Cell manager)
也叫做 Deployment Manager,它通过与单元中每台实际计算机上运行的 Node Agent 进行交互来管理分布式拓扑中的多个节点。技术上讲,它是运行了一个管理控制台实例的应用程序服务器,可以管理所有配置在同一个单元中的应用程序服务器。
要深入了解 IBM WebSphere Application Server 群集,请参阅下面 参考资料 中列出的 IBM 红皮书 IBM WebSphere V5.0 Performance, Scalability, and High Availability。
基本的 WebSphere Application Server 安装包括单独的应用程序服务器进程所需要的所有内容以及运行 Node Agent 所需要的代码。只是在节点加入到单元(加盟到单元中)时才会用到节点代理。WebSphere Application Server 的网络部署安装可以支持一个计算机系统网络,其中的计算机系统被配置为运行单个服务器安装的多个协作实例。
IBM WebSphere Application Server Network Deployment Package 包括一张 Application Server/IBM HTTP Server CD 和一张 Deployment Manager CD。在安装 Deployment Manager 之前,您首先要在每个节点上安装 Application Server,如下一节将详细介绍的。
开始之前
本文以用于 iSeries 和 pSeries 系统上的 SuSE Linux Enterprise Server (SLES) V8 为基础。
为了在 iSeries 和 pSeries 上创建一个基于 Linux 的 WebSphere Application Server 群集,您首先需要在群集中每台计算机上安装 WebSphere Application Server V5。您可以遵循“Installing WebSphere Application Server V5.0 for Linux on iSeries and pSeries”中的步骤来安装 WebSphere Application Server。
立负载均衡群集
负载均衡 是任务在群集的应用程序服务器之间的分布。按照本节的步骤来建立一个支持工作负荷管理和故障切换的 WebSphere Application Server 群集。
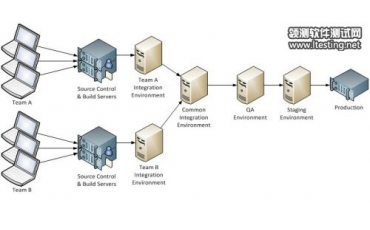
图 1 说明了在两个节点上 Application Server 的安装和在其中一个节点上 Deployment Manager 的安装,我们将在本例中用到这些。在实际的部署情形中,您可能会和安装节点一样将 Deployment Manager 安装在同一个网络中单独的一台机器上。
 javascript:window.open(this.src);" style="CURSOR: pointer" onload="return imgzoom(this,550)">
安装" Application Server 并配置网络
要再现图 1 中的例子,您需要在两台计算机上安装 Application Server。另外,您还需要在其中一台计算机上安装 Deployment Manager 。在我们的例子中,我们使用的是两个通过网络连接起来的基于 64 位 POWER 处理器的 iSeries 和 pSeries 服务器(或两个逻辑分区),运行的操作系统为 UnitedLinux Version 1.0 for iSeries/pSeries(PowerPC)。
两台机器,即 TP1 和 TP2,必须有固定的 IP 地址,同时必须属于一个有 DNS 服务器的网络。如果您没有用于试验和开发环境的 DNS 服务器,可以用 /etc/hosts 文件来配置网络。
清单 1 中给出了在 /etc/hosts 文件中对 TP1 和 TP2 的配置。注意,由于您的网络配置的不同,IP 地址会有变化。在这里您可以看到分配给 TP1 和 TP2 的完全主机名和短主机名的 IP 地址。
清单 1. 在 /etc/hosts 文件中对 TP1 和 TP2 的配置
TP1:~ # cat /etc/hosts
#
# hosts This file describes a number of hostname-to-address
# mappings for the TCP/IP subsystem. It is mostly
# used at boot time, when no name servers are running.
# On small systems, this file can be used instead of a
# "named" name server.
# Syntax:
#
# IP-Address Full-Qualified-Hostname Short-Hostname
#
127.0.0.1 localhost
# special IPv6 addresses
::1 localhost ipv6-localhost ipv6-loopback
fe00::0 ipv6-localnet
ff00:0 ipv6-mcastprefix
ff00:1 ipv6-allnodes
ff00:2 ipv6-allrouters
ff00:3 ipv6-allhosts
10.10.10.75 TP1.austin.ibm.com TP1
10.10.10.76 TP2.austin.ibm.com TP2
TP1: #
您必须现在在每台计算机上安装 WebSphere Application Server。通过 LaunchPad 安装程序,按照标准的步骤来安装 完全的 应用程序服务器。您将被询问输入本次安装的节点名和主机名:
在第一台机器上输入 TP1 作为节点名,输入 TP1 作为主机名。
在第二台机器上输入 TP2 作为节点名,输入 TP2 作为主机名。
(确保 TP1 和 TP2 是您的 DNS 服务器中的合法条目,或者位于您的 /etc/hosts 文件中)。
图 2 给出了一个运行 Application Server 安装时设置节点名和主机名的例子。

在两台机器上运行" WebSphere Application Server Installation Verification Test 来测试并启动 Application Server。并启动计算机 TP1 上的 IBM HTTP 服务器。
安装 Deployment Manager
既然已经完成了在两台计算机上的 Application Server 的安装,您现在可以在 TP1 上安装 Deployment Manager 了,如下:
启动 Deployment Manager CD 上的安装程序(LaunchPad):
# cd /media/cdrom
# ./LaunchPad.sh
单击 OK,为 LaunchPad 选择 English 语言。

在" WebSphere Application Server Network Deployment LaunchPad 窗口中,单击 Install the product 一次。
注意:请保持耐心,不要多次单击“Install the product”。应用程序可能需要一段时间才能完成一些初始化并响应到下一个屏幕。

当出现" Installation Wizard 语言的选择后,选择 English 并单击 OK。

在 Installation Wizard Welcome 窗口中,单击 Next。
在 Software License Agreement 窗口中,阅读 Software License Agreement 然后选择 I aclearcase/" target="_blank" >ccept the terms in the license agreement,并单击 Next。
由于您正在安装 Deployment Manager 的机器上已经安装了 Application Server,所以选择 Reconfigure the product to coexist with other versions of itself。安装程序将建议为 Deployment Manager 设置新端口和地址。记录下新的 Admin Console Port 和 Soap Connector Address 以备后用。单击 Next。

在功能选择窗口中,所需要的只有 Deployment Manager。所以,取消对 Web Services 和 Embedded Messaging Client 的选择,并单击 Next。

在下一个窗口中,接受默认的安装目录(/opt/WebSphere/DeploymentManager)并单击" Next。