


Apache 1.3.23 + Tomcat 4.0.2 + Load Balancing
发表于:2007-07-04来源:作者:点击数:
标签:
This article contains step by step instructions for configuring an Apache 1.3.23 web server which handles static content and delegates JSP (Java Server Pages) and Servlet requests to two Tomcat 4.0.2 Beta2 servers using AJP 13 connectors an
This article contains step by step instructions for configuring an Apache 1.3.23 web server which handles static content and delegates JSP (Java Server Pages) and Servlet requests to two Tomcat 4.0.2 Beta2 servers using AJP 13 connectors and a load balancing worker. Introduction
Apache 1.3 is a standards compliant, fast and mature web server which excels at delivering static content such as static HTML pages and images. The Tomcat web server is great for serving Java Server Pages and servlets, but it is not as fast as Apache for delivering static content.
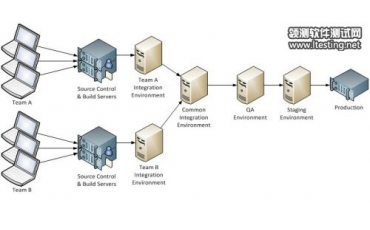
In order to build a fast, scalable web application, the requirements call for an Apache server that delegates servicing of JSP and servlet requests to multiple tomcat servers by using an Apache module, mod_jk, that performs load balancing with session affinity, also known as "sticky" sessions.
Session affinity explained. When a client browser requests a JSP page for the first time, the load balancer redirects the request received by Apache to one of the two tomcat servers; further requests originating from the same client session will be automatically forwarded to the same tomcat server, so that the user''s session data is retrieved.
This document describes how I configured Apache 1.3.23 to dispatch JSP and servlet requests to two Tomcat 4.0.2 Beta2 instances listening on different ports. This setup was done on a Linux system. Your mileage may vary.
1. Download the required software
Apache 1.3.23 source
Precompiled Tomcat 4.0.2 Beta2
The JK module, precompiled for Linux Glibc 2.2
2. Compile, Install and Configure Apache
2.1 Untar the source code.
tar fvxz apache_1.3.23.tar.gz
2.2 Edit httpd.h
If you are compiling a version of Apache that''s older than 1.3.23, you need to modify the HARD_SERVER_LIMIT constant from 256 to 1024. If you are compiling Apache 1.3.23, go to Step 2.3.
This compile-time constant defines the maximum possible number of server processes. It places a ceiling on the number of concurrent requests the server can handle. It is used to size several static data structures and therefore requires a recompilation in order to change the value.
The default value for Windows is 1024, because on that platform it refers to threads rather than processes. For all other platforms the default value (which does refer to actual child processes) is 256. We''re changing that to 1024.
The HARD_SERVER_LIMIT constant is located in the file named apache_1.3.23/src/include/httpd.h.
2.3 Compile and install
Here we compile Apache with support for loadable modules and with support for the include module, and we install it under /usr/local/apache
cd apache_1.3.23
./configure --enable-module=include --enable-module=so --prefix=/usr/local/apache
make install
2.4
Copy mod_jk.so to /usr/local/apache/libexec
2.5 Configure the JK Module in httpd.conf
Edit the Apache server''s configuration file httpd.conf which is located in the /usr/local/apache/conf directory.
2.5.1 Below "# LoadModule foo_module libexec/mod_foo.so", insert the following lines:
#
# Load mod_jk
#
LoadModule jk_module libexec/mod_jk.so
#
# Configure mod_jk
#
JkWorkersFile conf/workers.properties
JkLogFile logs/mod_jk.log
JkLogLevel info
2.5.2 Below the "DocumentRoot" line, insert the following two lines:
JkMount /*.jsp loadbalancer
JkMount /servlet/* loadbalancer
2.6 Create the workers.properties file
Now we will create a file called worker.properties, and we will place it under /usr/local/apache/conf. The worker.properties file tells Apache about the various Tomcat servers that are running, and on which port they are listening.
In my setup, I installed the two Tomcat servers in different directories, on the same machine as Apache. Feel free to put your Tomcat servers on different machines.
I made the first Tomcat server''s AJP13 connector listen on port 11009 instead of the default port which is 8009, and the second one listens on port 12009.
I have decided to name my tomcat servers tomcat1 and tomcat2. This is purely my choice.
Create the file exactly like this:
#
# workers.properties
#
# In Unix, we use forward slashes:
ps=/
# list the workers by name
worker.list=tomcat1, tomcat2, loadbalancer
# ------------------------
# First tomcat server
# ------------------------
worker.tomcat1.port=11009
worker.tomcat1.host=localhost
worker.tomcat1.type=ajp13
# Specify the size of the open connection cache.
#worker.tomcat1.cachesize
#
# Specifies the load balance factor when used with
# a load balancing worker.
# Note:
# ----> lbfactor must be > 0
# ----> Low lbfactor means less work done by the worker.
worker.tomcat1.lbfactor=100
# ------------------------
# Second tomcat server
# ------------------------
worker.tomcat2.port=12009
worker.tomcat2.host=localhost
worker.tomcat2.type=ajp13
# Specify the size of the open connection cache.
#worker.tomcat2.cachesize
#
# Specifies the load balance factor when used with
# a load balancing worker.
# Note:
# ----> lbfactor must be > 0
# ----> Low lbfactor means less work done by the worker.
worker.tomcat2.lbfactor=100
# ------------------------
# Load Balancer worker
# ------------------------
#
# The loadbalancer (type lb) worker performs weighted round-robin
# load balancing with sticky sessions.
# Note:
# ----> If a worker dies, the load balancer will check its state
# once in a while. Until then all work is redirected to peer
# worker.
worker.loadbalancer.type=lb
worker.loadbalancer.balanced_workers=tomcat1, tomcat2
#
# END workers.properties
#
That''s it, we''re done with Apache.
3. Install and Configure the Tomcat Servers
Now let''s suppose that Java 1.4 Beta 3 is installed under /usr/local/jdk1.4/. Create two Tomcat 4.0.2 servers and install them under /usr/local/:
tar fvxz jakarta-tomcat-4.0.2-b2.tar.gz
mv jakarta-tomcat-4.0.2-b2 /usr/local/tomcat1
cp -R /usr/local/tomcat1 /usr/local/tomcat2
In both /usr/local/tomcat1 and /usr/local/tomcat2, the same files will be modified. I here by present the modifications made to the files contained in the /usr/local/tomcat1 directory tree structure. You should also apply the same changes to the corresponding files located under the /usr/local/tomcat2 directory tree structure.
3.1 Modify catalina.sh
In my many years of consulting, I have learned not to rely on environment variables which can be unset by ignorant or malicious people. This is why I explicitely set the JAVA_HOME and CATALINA_HOME variables directly in the catalina.sh file.
At line 32, before the "# ----- Verify and Set Required Environment Variables " line, insert the following two lines:
JAVA_HOME=/usr/local/jdk1.4 ; export JAVA_HOME
CATALINA_HOME=/usr/local/tomcat1 ; export CATALINA_HOME
(Set CATALINA_HOME to /usr/local/tomcat2 in /usr/local/tomcat2/conf/catalina.sh)
3.2 Modify conf/server.xml
3.2.1 Add a unique jvmRoute to the Catalina engine
Near line 100, replace:
<Engine name="Standalone" defaultHost="localhost" debug="0">
with:
<Engine jvmRoute="tomcat1" name="Standalone" defaultHost="localhost" debug="0">
For tomcat2, put jvmRoute="tomcat2".
3.2.2 Change the control port
At line 13, replace:
<Server port="8005"
with:
<Server port="11005"
For the tomcat2 server, replace port 8005 with 12005. This will prevent the two servers from conflicting.
3.2.3 Change the AJP13 port
At line 75, in the AJP 13 connector definition, replace:
port="8009"
with:
port="11009"
For the tomcat2 server, replace port 8009 with 12009.
3.2.4 Disable the standalone HTTP port
We don''t want or need our tomcat servers to directly respond to HTTP requests. So we comment out the HttpConnector section between lines and 58 in the server.xml file.
Example:
<!-- Define a non-SSL HTTP/1.1 Connector on port 8080 -->
<!--
<Connector className="org.apache.catalina.connector.http.HttpConnector"
port="8080" minProcessors="5" maxProcessors="75"
enableLookups="true" redirectPort="8443"
aclearcase/" target="_blank" >cceptCount="10" debug="0" connectionTimeout="60000"/>
-->
3.2.5 Disable the WARP connector
At line 314, comment out the <Connector...WarpConnector...> tag.
Example:
<Service name="Tomcat-Apache">
<!--
<Connector className="org.apache.catalina.connector.warp.WarpConnector"
port="8008" minProcessors="5" maxProcessors="75"
enableLookups="true" appBase="webapps"
acceptCount="10" debug="0"/>
-->
Do not forget to do the same thing to tomcat2''s server.xml file.
3.3 Create test JSP pages (index.jsp)
3.3.1 Create a file named index.jsp and put it in the /usr/local/tomcat1/webapps/ROOT directory:
<html>
<body bgcolor=red>
<center>
<h1>Tomcat 1</h1>
</body>
</html>
3.3.2 Create a file named index.jsp and put it in the /usr/local/tomcat2/webapps/ROOT directory:
<html>
<body bgcolor=blue>
<center>
<h1>Tomcat 2</h1>
</body>
</html>
4. Start Tomcat1, Tomcat2 and Apache
/usr/local/tomcat1/bin/startup.sh
/usr/local/tomcat2/bin/startup.sh
/usr/local/apache/bin/apachectl start
5. Test your Installation
Now is the time to test your setup. First, verify that Apache serves static content.
Click on: http://localhost/. You should see the default Apache index.html page.
Now test that tomcat (either Tomcat 1 or Tomcat 2) is serving Java Server Pages.
Click on: http://localhost/index.jsp
If you get a red page, the page was served by the tomcat1 server, and if you get a blue page, it was served by the tomcat2 server.
Now test that session affinity - also known as sticky sessions - works within the load balancer. Hit the reload button of your web browser several times and verify that the index.jsp page you get is always received from the same tomcat server.
Supplemental Information
Question 1:
Why did you choose to use the AJP13 connector rather than the WARP connector that is recommended?
Answer:
The warp connector is used in conjunction with mod_webapp, and mod_webapp does not currently support load balancing.
Also, I found the documentation for the warp connector on the Jakarta web site to be quite lacking. See: http://jakarta.apache.org/tomcat/tomcat-4.0-doc/config/warp.html
I know that the future lies in the warp connector, but in the meantime, I needed something. The documentation did not explain to me exactly what benefits I would get from using the Warp connector as opposed to AJP13.
Question 2:
You might specify that creating two instances of the tomcat installation is not needed as you can share the main binaries and libs by specifying 2 distinct CATALINA_BASE variables.
True, but in real life the two tomcat servers are usually located on two different machines. My setup might be overkill for a single machine setup, but it''s easy to tar up the "tomcat2" server and put it on a second machine; you just have to change "localhost" to the appropriate machine name in /usr/local/apache/conf/workers.properties and you''re done.
Question 3:
What does not work and what does work in load balancing?
Answer:
Load balancing works great.
1. Session affinity works
Which means that when a client browser is directed to a Tomcat server by the load balancer, then future queries from that same browser session will always be directed to the same tomcat server. This is important because sessions that are created in a specific tomcat server, say "tomcat1", do not exist in the other server "tomcat2", and thus if the client was directed to another tomcat server than the one where his session is stored, then all his session data would be lost.
Some people are working on sessions that will be replicated across all tomcat servers in the cluster, so I''ll just wait for it to become available rather than make a homebrewed distributed session mechanism.
The downside of not having sessions replicated across all the tomcat servers in the cluster is that if one tomcat server dies, all the sessions that it contained are lost, which usually makes a lot of unhappy users.
2. Failover works
If one tomcat server dies, the load balancer then "rebalances" the queries to the remaining tomcat servers.
3. Failback works
When a tomcat server comes back from the dead, the load balancer automatically starts to send queries to it. So you can actually add capacity to your cluster on the fly.
4. Weighted load balancing works
In /usr/local/apache/conf/workers.properties, I assigned a load balancing factor of 100 to both "tomcat1" and "tomcat2" servers. Then I changed the lbfactor of "tomcat1" to 101, and I saw that effectively the "tomcat1" server received more load than the "tomcat2" server, which is something you want when for example your "tomcat1" server is a faster/newer machine while your "tomcat2" server is a slower machine which cannnot take as much load as the other one.
References
For more information, you should read An Apache Load Balancing Cluster. It talks about mod_jserv, which is now mod_jk, and it uses JServ instead of Tomcat, but the concepts are still valid.
Conclusion
The list of steps that are required to obtain a scalable web application solution based on Apache 1.3.23 and a group of distibuted Tomcat servers are well-defined and if you follow the receipe exactly, you should be able to achieve success.